Fun fact: Microsoft 365 doesn’t automatically protect your email domain from being impersonated. Despite all the advanced security features packed into Microsoft 365, email authentication isn’t fully configured out of the box, leaving a door wide open for attackers.
Without proper SPF, DKIM, and DMARC setup, anyone can send emails that look exactly like they came from your domain. It’s a lot like someone using your company letterhead to send whatever they want, and nobody can tell it’s fake.
As you can imagine, that’s not great for your reputation or your customers’ security.
But there’s some good news, too: you can actually fix this vulnerability yourself. No computer science degree required.
Setting up email authentication for Microsoft 365 might sound about as fun as filing taxes (because it is), but it’s one of those technical tasks that delivers massive security benefits for relatively little effort. And unlike many IT projects, this one has immediate results:
- Phishing attempts get blocked
- Your email deliverability improves
- Your domain reputation stays intact
Below, we’ll show you exactly how to implement SPF, DKIM, and DMARC for Microsoft 365, and we’ll do it without the confusing technical jargon. We’ll cover what these strange acronyms actually mean, why they matter for your email security, and how to set them up in Microsoft 365.
What email authentication actually does
Email authentication isn’t nearly as complicated as the tech industry makes it sound. At its core, it answers one simple question: “Is this sender who they claim to be?”
When you receive physical mail, you might recognize the sender by their handwriting, address, letterhead, or signature. Email doesn’t have those natural trust indicators. For starters, it’s all digital—which is exactly why we need SPF, DKIM, and DMARC to fill that gap.
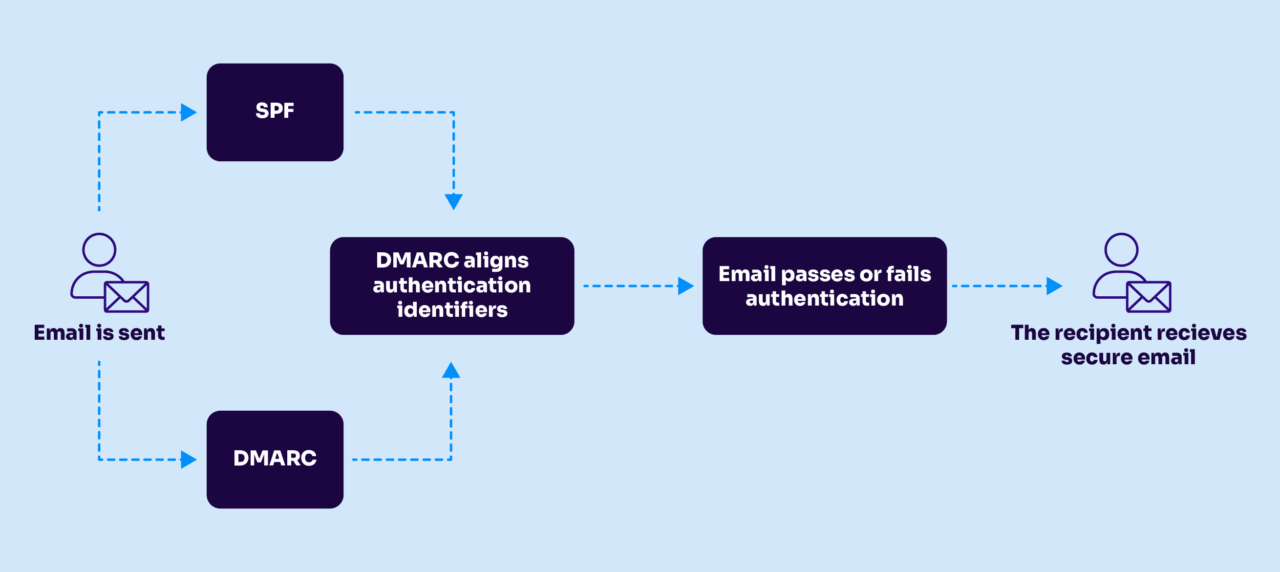
SPF
SPF (Sender Policy Framework) is basically just a list of servers that are allowed to send email as your domain. It tells the world: “These are the only email servers authorized to send messages from @yourcompany.com.”
When Microsoft 365 sends an email on your behalf, receiving servers check your SPF record to see if Microsoft is on your approved list. If not, that email looks suspicious. It gets blocked.
DKIM
DKIM (DomainKeys Identified Mail) adds a digital signature to your outgoing messages.
When you enable DKIM in Microsoft 365, every email gets this invisible signature. Receiving servers can verify that the signature is authentic and hasn’t been tampered with during transit.
DMARC
DMARC (Domain-based Message Authentication, Reporting, and Conformance) tells other servers what to do with messages that fail SPF and DKIM checks. Without DMARC, a receiving server might identify a suspicious email but deliver it anyway. With DMARC properly configured, you’re saying: “If an email claiming to be from us fails authentication, reject it.”
DMARC sends you reports about who’s sending email as your domain (both legitimate and suspicious) to give you visibility into all your sending.
Want to see how your domain is currently doing? Check your email authentication status now with our free Domain Checker tool. It takes 30 seconds and gives you a quick snapshot of your current protection level.
Check your
domain now
Enter your domain to see if it’s vulnerable to spoofing or if others are sending emails on your behalf. Instantly check your DMARC, SPF, and BIMI status with a detailed security report.
You’re not fully protected, learn more here.
Check your
domain now
Enter your domain to see if it’s vulnerable to spoofing or if others are sending emails on your behalf. Instantly check your DMARC, SPF, and BIMI status with a detailed security report.
You’re not fully protected, learn more here.
Check your
domain now
Enter your domain to see if it’s vulnerable to spoofing or if others are sending emails on your behalf. Instantly check your DMARC, SPF, and BIMI status with a detailed security report.
You’re not fully protected, learn more here.
Your Domain
Not protected AGAINST IMPERSONATION ATTACKS
DMARC NOT AT ENFORCEMENT
exampledomain1.com
Authentication Status for January 10, 2025
DMARC at Enforcement
SPF Record Configured
BIMI Ready
exampledomain1.com
Authentication Status for January 10, 2025
DMARC at Enforcement
SPF Record Configured
BIMI Ready
How they work together in Microsoft 365
These three authentication protocols work together in Microsoft 365:
- SPF verifies the sending server is authorized (Is this coming from Microsoft’s servers?)
- DKIM confirms the message hasn’t been altered (Is the digital signature intact?)
- DMARC enforces what happens to messages that fail (Block them? Send to spam? Just monitor?)
Here’s where Microsoft 365 falls short: while it’s ready to implement all three standards, it doesn’t fully configure them by default.
Microsoft 365 automatically handles the sending side for SPF, but you still need to create the DNS record yourself. DKIM is disabled by default and requires both admin center configuration and DNS records. And DMARC isn’t factored in at all—it’s entirely on you to implement.
Adding email authentication for Microsoft 365
Fortunately, setting up the full stack (SPF, DKIM, and DMARC) takes less than an hour of actual work, though you’ll need to wait for DNS changes to propagate. We’ll tackle each protocol step by step, starting with the foundation: SPF.
Setting up SPF for Microsoft 365
SPF tells the world which servers can legitimately send email on behalf of your domain. For Microsoft 365, this is simple:
- Log in to your DNS provider (like GoDaddy, Cloudflare, or whoever hosts your domain)
- Create a new TXT record with these settings:
- Host: @ (or leave blank, depending on your provider)
- Value: v=spf1 include:spf.protection.outlook.com -all
That single line tells receiving servers: “Only Microsoft 365 and anyone else I explicitly list here can send email as my domain. Reject everything else.“
If you already have an SPF record, don’t create a second one (that breaks things). Instead, add Microsoft’s include statement to your existing record:
v=spf1 [your existing includes] include:spf.protection.outlook.com -allSetting up DKIM for Microsoft 365
DKIM adds that digital signature we talked about. Unlike SPF, setting up DKIM requires both Microsoft 365 admin changes and DNS updates:
- Sign in to the Microsoft 365 admin center.
- Navigate to Settings > Domains.
- Select your domain and click “Prepare records.”
- Enable DKIM signing in the Security section.
Next, you’ll need to create two CNAME records in your DNS. Microsoft will show you the exact values, but they’ll look something like:
- Host: selector1._domainkey Value: selector1-yourdomain-com._domainkey.yourdomain.onmicrosoft.com
- Host: selector2._domainkey Value: selector2-yourdomain-com._domainkey.yourdomain.onmicrosoft.com
Once you’ve added these records, go back to the Microsoft 365 admin center and enable DKIM signing for your domain. Microsoft will now start digitally signing all outgoing messages.
Setting up DMARC for Microsoft 365
DMARC completes the holy email authentication trinity by telling other servers what to do with messages that fail SPF or DKIM checks. Unlike the other two, DMARC is entirely configured through DNS:
- Create a new TXT record with these settings:
- Host: _dmarc
- Value: v=DMARC1; p=none; rua=mailto:dmarc-reports@yourdomain.com
This creates a monitoring-only DMARC policy that won’t block anything (yet) but will send reports to the email address you specify.
The p=none part means you’re just monitoring for now. Once you’ve reviewed the reports and confirmed that your legitimate email is passing authentication, you can update to p=quarantine or p=reject for actual enforcement.

Common problems (and fixes) for Microsoft 365 authentication
You know how it goes. Even if you follow these steps perfectly, something inevitably will go wrong. If not today, then tomorrow. Here are some of the most common issues (and fixes) people encounter with Microsoft 365 authentication:
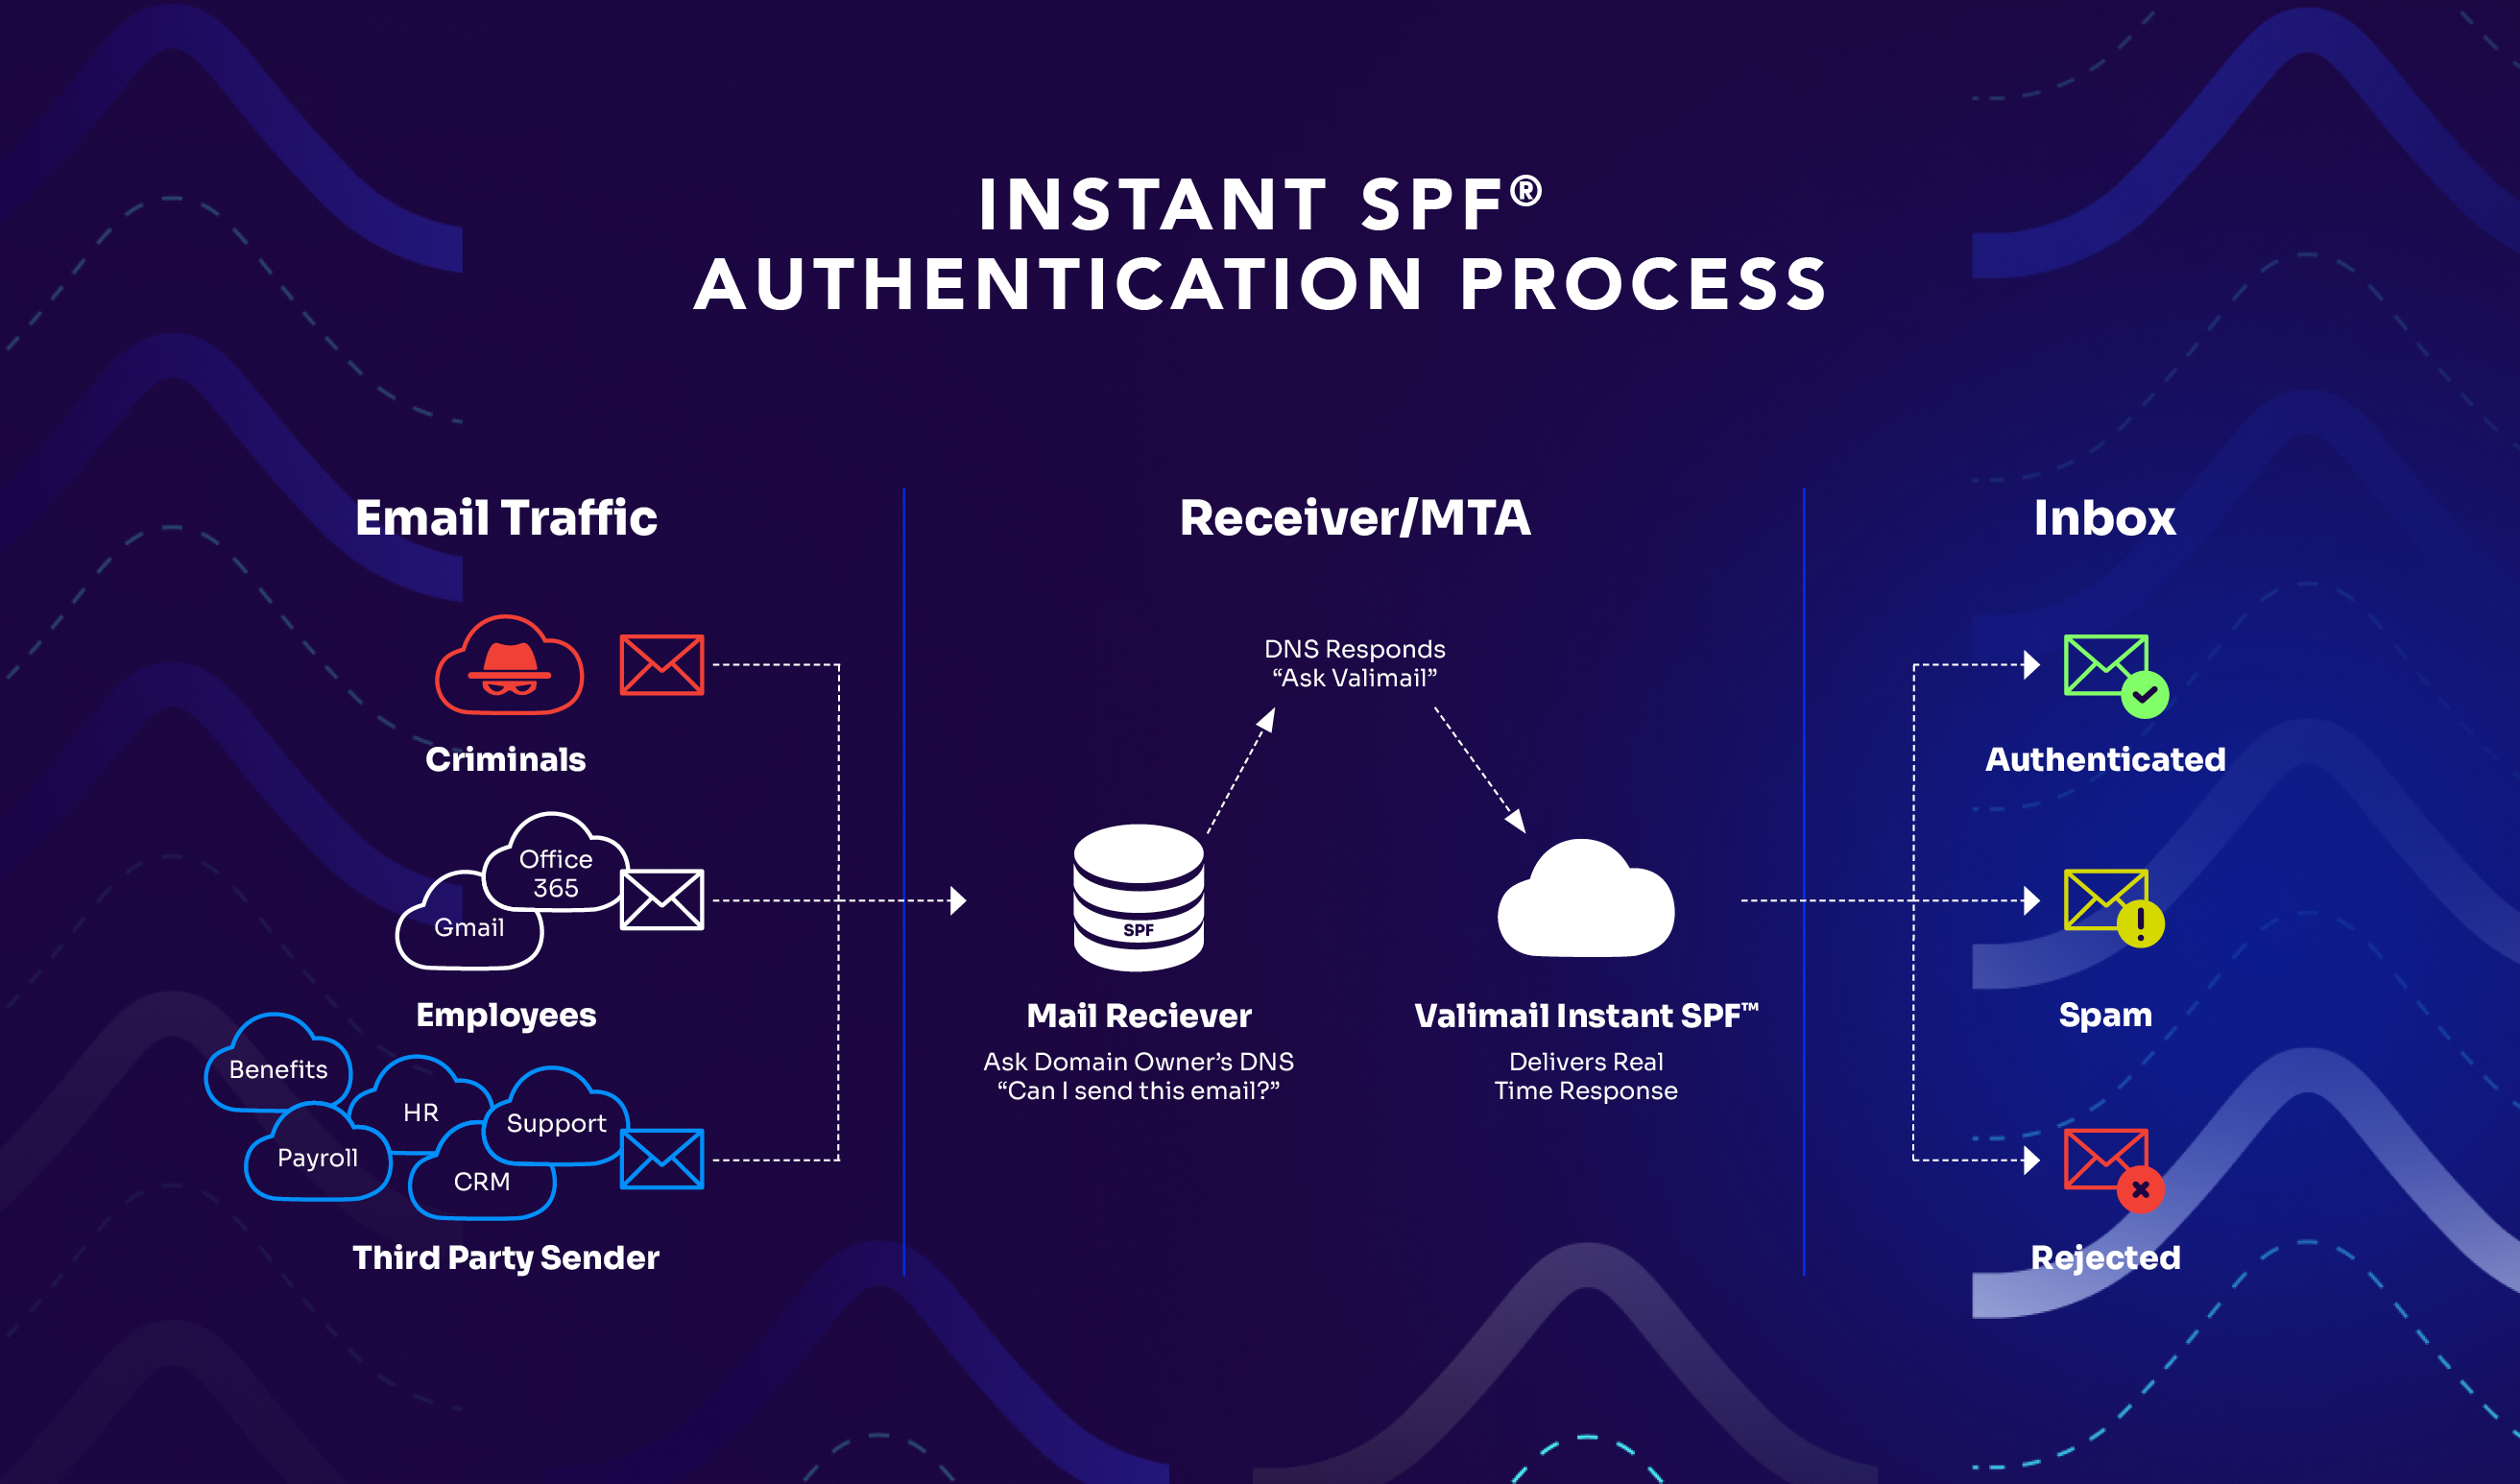
1. Problem: “Too many DNS lookups” errors. Microsoft 365 uses nested includes that consume several of your 10 allowed DNS lookups. If you’re also using other services like Mailchimp or Salesforce, you might hit this limit.
Solution: Instead of adding more includes, you’ll need to consolidate your email sending providers or use a trusted service. Some people turn to SPF flattening, but that’s not reliable. Instead, use a service like Valimail’s Instant SPF®.
2. Problem: Missing third-party senders. You’ve set up SPF, but suddenly your marketing emails from third-party platforms are failing authentication.
Solution: Make sure you’ve included all authorized sending services in your SPF record. Your record might look like:
v=spf1 include:spf.protection.outlook.com include:_spf.mailchimp.com -all3. Problem: SPF passes but alignment fails. This happens when the “envelope from” domain (used in the SMTP transaction) doesn’t match your “from” domain (what users see).
Solution: Check if you’re using a different sending domain for your SMTP settings, or if Microsoft is using a different subdomain for sending. You may need to adjust your DMARC record to use relaxed alignment with aspf=r.
4. Problem: DKIM not signing all messages. You’ve enabled DKIM, but some messages still aren’t getting signed.
Solution: Verify DKIM is enabled for all applicable domains in the Microsoft 365 admin center. Remember that Microsoft applies DKIM to outbound messages only after enabling it for each specific domain.
5. Problem: DKIM selectors not found. Your DKIM implementation isn’t working because the selectors can’t be found in DNS.
Solution: Double-check your CNAME records. The most common mistake is formatting errors in the host name or target value.
6. Problem: Legitimate emails failing DMARC. Your own legitimate emails are failing DMARC checks.
Solution: Review your DMARC reports to identify which authentication method is failing. If SPF is failing, check your SPF record. If DKIM is failing, make sure it’s properly enabled in Microsoft 365. Start with p=none until everything passes correctly.
Take the headache out of Microsoft 365 email security
Congratulations! You now know how to properly secure your Microsoft 365 email with SPF, DKIM, and DMARC. You’ve closed a major security gap that most organizations leave wide open.
Still, this isn’t a “set it and forget it” situation. Email authentication requires ongoing maintenance:
- Every time you add a new email service, you need to update your SPF record
- DKIM keys should be rotated periodically for maximum security
- DMARC reports need regular review to catch new issues
- Microsoft 365 updates occasionally require tweaks to your configuration
This ongoing maintenance becomes yet another task on an already overflowing plate. The time spent checking reports, updating records, and troubleshooting issues adds up quickly (especially if you’re managing multiple domains).
Fortunately, we can help.
Valimail’s automated DMARC solution takes the ongoing work off your shoulders by handling the monitoring, maintenance, and updates that email authentication requires. With Valimail:
- SPF, DKIM, and DMARC all work together without the complexity
- Authentication updates happen automatically when you add new services
- You get clear, actionable insights instead of confusing DMARC reports
- Your domains stay at enforcement without constant manual adjustments
And you can get it all for free! Valimail Monitor provides full visibility into your domain, allowing you to see which sending services are using it. And it’s free for all Microsoft 365 customers.
FAQs on setting up SPF, DKIM, and DMARC for Microsoft 365
Does Microsoft 365 automatically protect my domain from email spoofing?
No, Microsoft 365 does not automatically protect your domain from spoofing. While it includes powerful security tools, Microsoft 365 does not fully configure SPF, DKIM, or DMARC by default, which means attackers can still send fraudulent emails that appear to come from your domain. To prevent spoofing and enhance deliverability, you must manually configure these DNS records and enable DKIM in the Microsoft 365 admin center.
How do I set up SPF, DKIM, and DMARC for Microsoft 365?
Setting up email authentication in Microsoft 365 requires configuring DNS records and enabling DKIM in the admin portal:
- SPF: Add or update your TXT record to include
spf.protection.outlook.com. - DKIM: Enable DKIM in Microsoft 365 and create two CNAME records for your selectors.
- DMARC: Create a TXT record at
_dmarcwith your preferred policy (starting withp=nonefor monitoring).
These three protocols work together to validate legitimate email and block spoofed messages. Full setup typically takes under an hour.
What are the most common Microsoft 365 email authentication issues (and how do I fix them)?
Common problems include SPF lookup limits, missing third-party senders, DKIM selector errors, and DMARC alignment failures. Fixes often involve consolidating SPF includes, adding all authorized senders, correcting DKIM CNAME formatting, or adjusting DMARC alignment settings. Reviewing your DMARC reports helps pinpoint which authentication method is failing so you can update your DNS records accordingly.