DKIM (DomainKeys Identified Mail) is an authentication protocol for email that you can use with Office 365. It adds a cryptographic signature to verify that interlopers haven’t altered the contents of email in transit. Unlike the older SPF protocol, it can also work even when mail is forwarded, as long as the forwarding doesn’t result in the message being altered. Furthermore, DKIM can help another email authentication protocol called DMARC combat fraud by verifying the authenticity of the visible From: domain in an email.
Luckily for users of Office 365, DKIM is enabled by default for everyone. However, for those who want to deploy DKIM on a custom domain or control their own DKIM keys, Microsoft makes it easy to implement DKIM yourself as well. With a bit of configuration in Office 365 and the addition of DNS records, you can begin enjoying the improved email security offered by DKIM.
In this article, we’ll explain what DKIM does and guide you step by step through setting it up with Office 365. We want you to come away from the article with a realistic, balanced understanding of what DKIM can do, so we’ll wrap things up with an overview of DKIM’s limitations.
Steps to Deploy DKIM on Office 365
Before we get started, let’s briefly summarize the steps involved in setting up DKIM. Additionally, we’ll add a reminder of why each step is important. Feel free to come back to this as a reference if you’re unsure about why we need to go through a given step in the process.
| Step for Setting up DKIM | Why It’s Necessary |
|---|---|
| Create DKIM Keys | DKIM keys are necessary to add a DKIM signature. They’re also how recipient hosts verify your signature. |
| Publish DKIM Public Keys | For recipients to verify mail received from your domain with DKIM, they need to access your DKIM public key via DNS. |
| Verify That DKIM Is Working | Make sure that mail is sent with a signature, the public key is accessible to recipients, and that signatures are validating at the receiving end. |
Overview of DKIM
Before we start showing you how to set up DKIM, let’s take a brief detour to see what DKIM really does. DKIM uses a private key to attach a digital signature to outgoing mail. Recipient hosts can verify the signature using the public key hosted at a special subdomain identified by something called the DKIM selector.
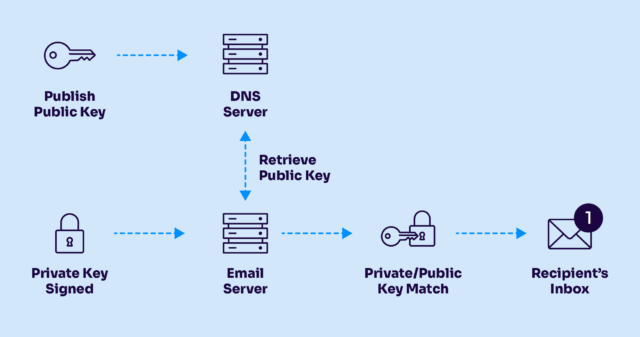
DKIM uses DNS and public key cryptography to digitally sign emails
By itself, a valid DKIM signature only tells you that interlopers haven’t modified the message in transit and that the signing domain is willing to stake its reputation on the message by taking responsibility for it.
A raw email message consists of more than just the actual message body: It also contains headers that include the time the email was sent, who sent it, and so on. The DKIM signature is attached to the email as an additional header, consisting of a series of key/value pairs called “tags.” Here is an example of such a header using an imaginary domain:
DKIM-Signature: a=rsa-sha256; v=1; c=relaxed/relaxed; d=example.test; q=dns/txt; s=k1; t=1654719172; x=1654927972; h=Message-Id: To: From: Subject: Content-Type: Mime-Version: Date: Sender: X-Feedback-Id; bh=LAdFzEXLCR2PxtL57Q1J8gVLRvxStMw5D5/DPsp6QRk=; b=QeSLqxV6QI3LsG6UwSwCvhETajFyYm7boHuBPTaDDFw7qtpQjGDRGF1UXKgiKEHrZFkj5FTr nlPTms9Jyu2xwbjx668GIRjX0K2roJ3sOLDyzRTy+yv0xKsuwRcIzZOdS0zGGx0gMRbN4iIa 5tHxGgCmBvw9UTdTh4lTMMYb/rQ=
Using the s tag, we can find the DKIM selector that allows receiving hosts to look up the public key. Here, the selector points to k1, so we combine that with the special _domainkey subdomain, like this:
nslookup -type=TXT k1._domainkey.example.test
Server:   	 10.240.80.246
Address:    10.240.80.246#53

Non-authoritative answer:
k1._domainkey.example.test   text = "v=DKIM1; k=rsa; p=MIGfMA0GCSqGSIb3DQEBAQUAA4GNADCBiQKBgQDxmSG/GBpZbm+aZLPbHARed3eMmM9k37S67cou8vkAsTr3yYIFQRzQopuG6P8umkLqvkfKpunEZWrAGlBi0SxuC0IbzqHMhlHdJ1oNlqiUPJBukrf9trXmJ7tG/14ttsHrTu3o57KdpOCF33IfT+Rqu0J0L2f76Ey8kpU7wViSZwIDAQAB"
We could go infinitely deep exploring each tag along with other subtleties of DKIM. However, let’s stay practical and focus on the exciting part you’ve likely been waiting for: actually using DKIM with Office 365.
Setting up DKIM with Office 365
Under normal circumstances, setting up DKIM can be a confusing and tedious process. Not so with Office 365, which goes to great lengths to make the process as simple as possible for admins.
Note: Office 365 automatically sets up DKIM for its onmicrosoft.com domains. You’ll only need to worry about setting up DKIM yourself if you use a custom domain.
Create Keys
The Office 365 web interface allows you to create keys with a few clicks. Browse to https://protection.office.com/dkimv2 and click on the custom domain for which you’d like to enable DKIM.

Creating DKIM keys on Office 365’s web interface
Click Create DKIM Keys and copy the CNAME record it provides you with. You’ll need it for the next step.
|
Platform
|
Success Rate
|
Success Rate Frame
|
Estimated FTEs
|
Maintenance
|
Marketplace Apps Identified
|
|---|---|---|---|---|---|
|
DIY Manual
|
20%
|
12+ Months
|
2-3
|
Never ending
|
~100 services
|
|
Outsourced Manual
|
<40%
|
9-12 Months
|
1-2
|
Never ending
|
~100 services
|
|
Valimail Automation
|
97.8%
|
0-4 Months
|
0.2
|
Automated
|
6,500+
|
Publish Keys
Go into your DNS provider’s interface and create a CNAME record. The value will be the CNAME record Office 365 generated for you in the previous step. How exactly this works depends on your DNS provider. For example, here’s how it works on Gandi, a popular domain registrar:

The above values from the screenshot are just placeholders – the Office 365 web interface will provide you with the correct Name and Hostname values to use. Underscores are not allowed in hostnames; only letters, numbers, and the hyphen.
Enable DKIM
Now you can go back to the domain on Office 365 and enable DKIM.
That’s it! You’ve successfully set up DKIM for your custom domain on Office 365.
Verify That DKIM Is Working
Just in case, it’s best to make sure the process actually worked. One easy trick for doing this is to send an email from your domain to a Gmail address. Then, in Gmail, open the email and click “Show original.” It should show a DKIM row in a table that says “PASS.”

If the row does not appear, it might be that your CNAME record has not propagated. DNS propagation can take as long as 48 hours, though in practice, it’s usually much quicker.
Limitations
Although most email admins will benefit from using DKIM, the protocol has limitations that you should be aware of when deploying it for your domain.
In this section, we’ll look at four critical limitations of DKIM that will keep your expectations grounded in reality. Many of these issues are addressed by Office 365’s secure default settings. However, it’s still important that admins understand these limitations as important factors in DKIM’s security landscape.
Replay Attacks
DKIM doesn’t necessarily sign every part of an email. Thus, if you were to copy a legitimately signed email and change part of it that isn’t signed, your forged email would pass DKIM. This is known as a DKIM replay attack.
To protect against this, you must ensure that DKIM is signing the following headers:
- Subject:
- From:
- To:
- Cc:
- Date:
- Message-ID:
- Reply-To:
Additionally, the entire message body must be canonicalized when calculating the value for the bh tag. You can learn more about canonicalization from RFC 4871, section 3.4. Finally, those same headers mentioned above should be “over-signed” to guard against DKIM replay attacks. More information on over-signing can be found in RFC 6376, section 5.4.
Private Key Leakage
If you wish to use DKIM as an authentication method, you can combine it with DMARC to verify the visible From: domain in emails. The underlying assumption is that if the recipient can verify your signature with your public key, then your private key must have signed it. Furthermore, since the private key (as the name suggests) is only possessed by you, then you must be the original signatory. Thus the signing domain has taken responsibility for the message, putting their reputation on the line.
At least, this is the logic behind authenticating with DKIM and DMARC. However, if attackers acquire your private key, they can create valid DKIM signatures for your domain. Such email would pass DKIM validation.
This is why protecting your private keys is so important. You should also periodically rotate your keys. That way, if your keys are ever leaked, they won’t continue working indefinitely.
DMARC Needed to Stop Certain Attacks
A valid DKIM signature merely tells us that the signature of the email matches the content. To go a step further and ensure that the visible From: domain matches the domain marked by DKIM in the d tag, you’ll need to implement DMARC.
To learn more about DMARC and how it builds on DKIM, check out our article DMARC vs DKIM.
Short Key Vulnerability
According to a 2012 Wired report, attackers can crack a 512-bit DKIM key in less than 72 hours using cloud computing resources. Today, such an attack would take even less time.
To prevent cracking, 2048-bit keys or stronger are recommended as reasonably secure.

Minimal resource requirement with only a single one time DNS change needed
DMARC Enforcement guarantee and 97.8%+ success rate
100% Automated service discovery and 1-click validation
Conclusion
DKIM is a powerful tool for improving the security of your email on Office 365. In addition to ensuring the integrity of mail in transit, DKIM can also power DMARC’s ability to verify the visible From: domain in an email. This helps protect users on your domain from fraud and abuse, as long as you do DMARC and DKIM validating on inbound mail. It’s also important to carefully configure DKIM to mitigate the risk of suffering a DKIM replay attack.
Setting up DKIM was once a challenging feat, but the convenience of Office 365 makes DKIM trivial to set up for your custom domain. By simply creating the keys using Office 365’s web interface, setting up a single DNS record, and verifying that everything worked, you can begin enjoying the considerable benefits that DKIM offers.