Brand Indicators for Message Identification (BIMI) is an email security protocol that allows marketers to display branded logos in recipients’ inboxes. BIMI is a powerful new tool for companies that want to stand out in recipients’ inboxes and build trust.
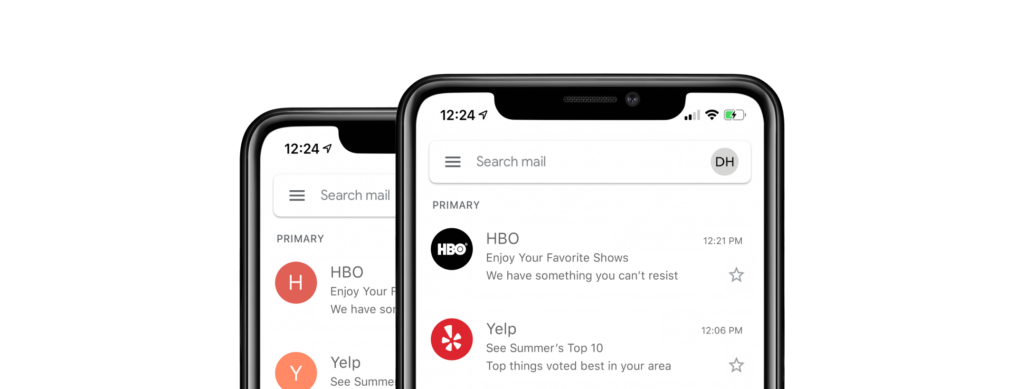
To enable BIMI, you need a way to tell email clients where to find your branded logo and a way to prove that you are the rightful owner of the branded logo. The BIMI protocol achieves these objectives via BIMI records, which leverage the Domain Name System (DNS) to make this information available. However, there’s more to deploying a BIMI record than simply adding a DNS record. For example, you need the logo image file, a Verified Mark Certificate (VMC) to prove your ownership of the branded logo, and a webserver to host these files on.
In this article, we’ll help you understand what the parts of a BIMI record do and how to set one up and deploy it to production.
Parts of a BIMI record
A BIMI record consists of only a few simple parts. For reference, we’ll summarize these base components here so you can look them up as needed later on in the article.
| Component | Meaning |
|---|---|
| Subdomain | The BIMI record itself must be served from the default._bimi subdomain. |
| Verified Mark Certificate | This is a cryptographic file that proves your ownership of the branded logo. |
| Branded logo | An SVG image file containing your branded logo; this is the image that will appear in recipients’ inboxes. |
| Version | The BIMI version in your BIMI record. Currently, only one version exists: BIMI1. |
It may seem simple, but making each of these parts work involves several services that need to coordinate their activities.
Now that you’ve seen the raw ingredients of BIMI, let’s use them to create a real BIMI record, so you can see how each component works in context.
Deploying a BIMI record
Email inboxes access your BIMI record using the Domain Name System. However, before you can actually create the DNS record, you need to take care of some prerequisites.
One major prerequisite is Domain-based Message Authentication, Reporting & Conformance (DMARC), an email authentication protocol that protects your domain from impersonation. We won’t cover DMARC in this article, but if you’d like to learn about DMARC, check out this article: What is DMARC?
Set up a logo
The core functionality of BIMI is displaying a branded logo, so you need a file containing an image that inboxes can access. The image file must be in SVG format and a trademark that you control.
You can learn about the requirements for a BIMI-compliant logo here: https://bimigroup.org/creating-bimi-svg-logo-files/.
Acquire a Verified Mark Certificate (VMC)
To prevent spammers from using your BIMI logo in their emails, you must prove ownership of the branded logo using a cryptographic file called a Verified Mark Certificate. A certificate authority like DigiCert can give you this file if you go through the appropriate verification process:
“DigiCert’s validation team will […] have a video call with the applicant where they hold their ID in front of the camera. Finally, DigiCert must also validate that your logo is officially and legally trademarked and formatted correctly. ”
Source: How do I get a Verified Mark Certificate (VMC)?
You can learn more about acquiring a VMC by reading our companion article: Verified Mark Certificate.
Serve the VMC and logo via a web server
Once you have both the VMC file and the logo image file, you need to serve them via a web server. To prevent man-in-the-middle attacks, you must make the content available via HTTPS.
You can verify that the content is available via HTTPS like this:
curl https://your-domain.example/
If you get an error, you may want to troubleshoot your TLS certificate.
Note: You don’t have to host these files on any particular path. Whatever path you decide to use, you’ll be able to point to it when you make the BIMI record itself.
Create a BIMI record
A BIMI record above consists of three “tags”:
- “v” sets the BIMI version number. Currently,
BIMI1is the only version. - “l” points to the URL that hosts the logo image file.
- “a” points to the URL that hosts the VMC file.
In practice, the actual BIMI record should look something like this:
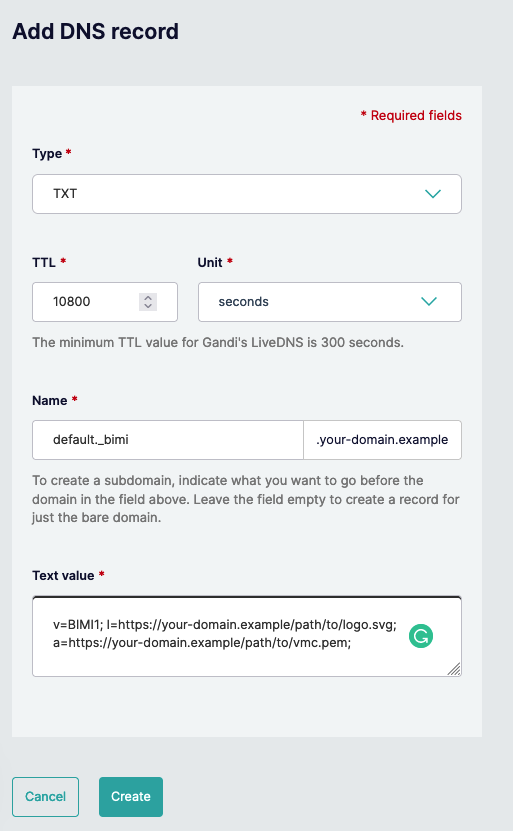
v=BIMI1; l=https://your-domain.example/path/to/logo.svg; a=https://your-domain.example/path/to/vmc.pem;
You merely need to modify the “a” and “l” tags to point to the URL where your content is hosted, and then you can deploy the record to production.
If you can’t acquire a VMC, you can leave the “a” tag blank, creating what is called a self-asserted BIMI record. However, this approach is not ideal because some mail platforms will not display your BIMI logo in inboxes if you don’t have a VMC.
Deploy your BIMI record
Deploying a BIMI record is as easy as creating a TXT record in your DNS settings. You should be able to do this by going into the domain settings panel on your registrar’s website.
After giving the new record some time to propagate, you can check that the record appears using a command-line tool like nslookup.
$ nslookup -type=txt default._bimi.your-domain.example
Server:   	 10.240.80.246
Address:    10.240.80.246#53

Non-authoritative answer:
default._bimi.your-domain.example    text = "v=BIMI1; l=https://your-domain.example/path/to/logo.svg; a=https://your-domain.example/path/to/vmc.pem;"
Great, our BIMI record shows up in DNS! However, this is insufficient to prove that your domain is BIMI-ready. For example, the VMC or logo files might not be accessible via HTTPS, the logo file might be too big, or the VMC file might be corrupted. We still need to ensure that all the parts of our BIMI deployment are valid.
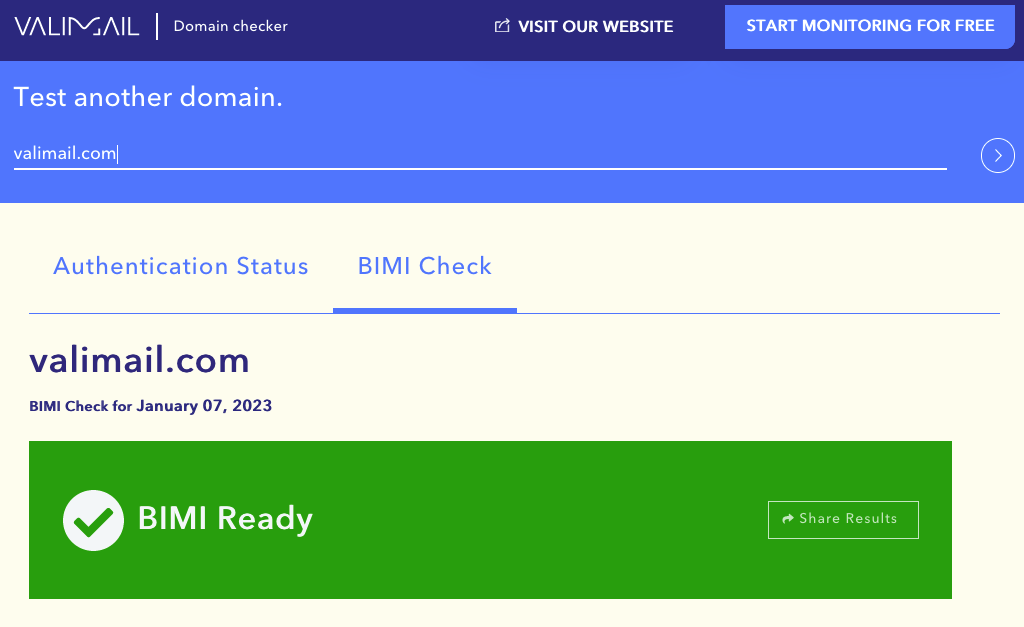
Verify BIMI
You can verify that you completed the previous steps correctly and BIMI now works for your domain by using Valimail’s BIMI checker:
Recommendations
With the instructions above, you can create and deploy a BIMI record. However, there are some specific details you might want to know about to ensure that your deployment is safe and optimized. In this section, we’ll give you some tips and best practices for doing BIMI right.
Self-asserted BIMI records
Earlier in this article, we briefly mentioned that leaving the “a” tag blank results in a self-asserted BIMI record. This is undesirable because without a VMC, platforms have no way to verify that your organization has legitimate rights to use the logo. Some platforms may still display the logo, but others will not. According to BIMI Group’s documentation on VMCs:
“If you left the ‘a=’ attribute blank in the BIMI record, you’ve published a self-asserted logo. Some mailbox providers (e.g. Gmail), however, do not accept a self-asserted BIMI record and require that the logo be ‘certified’ as being associated with a specific company and domain.”
– https://bimigroup.org/verified-mark-certificates-vmc-and-bimi/
That said, self-asserted BIMI records are not entirely without merit. Acquiring a VMC is costly, and for organizations that lack the funds to pay for a VMC, a self-asserted BIMI record may be the only option available.
Compliant BIMI logo
Not just any image file works as a BIMI logo. The logo image file must use a custom version of SVG, called SVG Portable/Secure (SVG P/S). Luckily, if you already have your logo as an SVG file, you can convert it to SVG P/S using these open source tools created by The Authindicators Working Group: https://github.com/authindicators/svg-ps-converters.
To learn the ins and outs of BIMI logos, check out our article on the topic.
Automating BIMI
Successfully deploying BIMI involves getting a lot of small details right, such as:
- Strict DMARC policy
- Compliant logo
- Legitimate VMC file
- Web server
The list goes on. Relying entirely on human email administrators to implement all of this work correctly and maintain it over time is difficult. It’s more convenient, less error-prone, and cheaper to let an automated service power your BIMI deployment.
Valimail Amplify partners with DigiCert and leading email platforms to automate the hard parts of BIMI for you. You can learn more here: https://www.valimail.com/products/amplify/.
Choose a simple solution for easily getting your logo in inboxes
Implement BIMI at a fraction of the cost and time compared to deploying it manually
Increase open rates and visibility for your marketing content
Conclusion
A BIMI record is a fairly simple solution to letting email inbox providers access your BIMI logo and verify your brand ownership with your VMC file. However, the DNS record itself is just one piece of the puzzle. BIMI deployment is only possible when various other components of the BIMI ecosystem are present, such as:
- A strong DMARC policy
- A VMC file
- A logo file
- A webserver with HTTPS enabled
With phishing constantly threatening the trustworthiness of marketing emails, tools like BIMI are powerful for helping you make recipients feel safe.