Ever get that annoying “DMARC policy not enabled” warning and wonder what it actually means? You’re not alone. This warning is the digital equivalent of your car’s check engine light—it tells you something needs attention but doesn’t explain exactly what or how to fix it.
Super helpful, right?
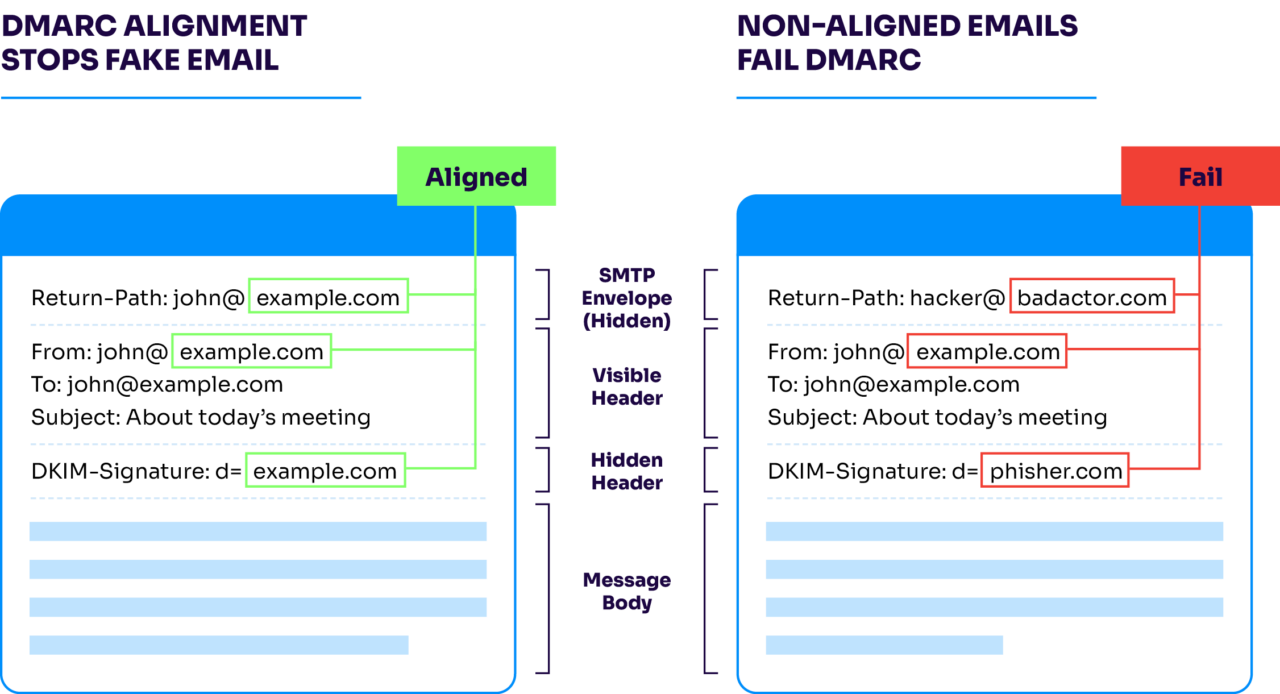
In plain English, this warning means your domain’s emails aren’t fully protected because you haven’t turned on DMARC’s enforcement capabilities. You might be collecting data (the monitoring part), but you’re not telling other email servers what to do with suspicious messages claiming to be from your domain.
Why should you care? Because without proper DMARC enforcement, anyone can send emails pretending to be you or your company. Fortunately, it’s not too hard to do something about it.
Below, we’ll walk through exactly what this error means, why having DMARC in monitoring-only mode isn’t enough, and the step-by-step process to fix it. And we’ll do it all without the confusing technical jargon that makes most IT documentation feel like it was written for robots rather than humans.
You’re welcome.
What “DMARC policy not enabled” actually means
This error typically shows up when your domain either has no DMARC record at all, or you’ve set it to “p=none” (which is basically just monitoring mode). While “p=none” is a great first step, it only watches bad things happen without stopping them.
Here’s what’s really going on: when your DMARC policy is set to “none,” you’re telling receiving email servers, “Hey, just let me know if someone’s pretending to be me, but don’t actually do anything about it.”
You get the reports, but the imposters still get through.
Depending on which tool you’re using, this warning might show up with different wording:
- “DMARC quarantine reject policy not enabled” (common on MXToolbox)
- “DMARC policy set to monitoring only”
- “DMARC not at enforcement” (Valimail’s term for this situation)
- “p=none detected in DMARC record”
They all mean the same thing: your domain isn’t telling other email servers to take action against fake emails.
Why you need to take action
Setting DMARC to “p=none” is like having a security guard who can only write reports about break-ins but can’t actually stop them. Sure, you’ll know someone broke in, but wouldn’t you rather prevent it in the first place?
Monitoring mode does give you valuable information through DMARC reports. These reports show who’s sending email as your domain (both legitimate and suspicious sources). But while you’re analyzing these reports, phishing emails claiming to be from your domain are still landing in people’s inboxes.
Without proper DMARC enforcement:
- Scammers can send emails that look exactly like they came from your domain
- Your customers or employees might get phishing emails that seem legitimately from you
- Your brand reputation takes a hit when people receive spam that appears to be from your company
- Your email deliverability can suffer as your domain gets associated with suspicious activity
The three DMARC policy levels
Each DMARC policy offers different protection, but you need to know which one to use to fix those annoying “policy not enabled” warnings.
| Policy level | Tag value | What it does | When to use it |
| Monitoring | p=none | Collects data but takes no action on suspicious emails | When first implementing DMARC or analyzing your email ecosystem |
| Quarantine | p=quarantine | Suggests suspicious emails be sent to spam/junk folders | As an intermediate step before full rejection |
| Reject | p=reject | Advises receiving servers to block suspicious emails completely | For maximum protection after testing is complete |

Monitoring mode (p=none)
When your DMARC is set to “p=none,” you’re telling recipient servers: “Let suspicious emails through, but please send me reports about them.”
This mode is perfect for when you’re first setting up DMARC because it helps you:
- See who’s legitimately sending email as your domain
- Identify potential configuration issues with your SPF and DKIM
- Avoid accidentally blocking legitimate emails while you sort things out
Ultimately, it provides zero protection. Phishing emails claiming to be from your domain will reach their recipients right away.
Quarantine mode (p=quarantine)
Quarantine mode tells receiving mail servers: “If an email claiming to be from my domain looks suspicious, don’t deliver it to the inbox—put it in spam instead.”
This helps in a few ways:
- Suspicious emails get flagged and moved to spam folders
- Recipients are less likely to see and act on phishing attempts
- You still get reports about what’s being quarantined
- It’s a safer intermediate step before full rejection
The downside is that quarantine is interpreted differently by different email providers. Some might put messages in spam, others might add warning banners, and some might ignore your suggestion entirely.
Sure, it’s better than nothing, but not as decisive as reject.
Reject mode (p=reject)
Reject mode tells receiving mail servers: “If this email doesn’t pass authentication, don’t let it through at all.”
This is the gold standard for DMARC protection because:
- Phishing emails get blocked before reaching their targets
- Your domain reputation stays cleaner
- It sends a clear message that you take email security seriously
- Most major email providers respect and implement reject policies
Reject mode (when properly implemented) provides the strongest protection against email spoofing and is the ultimate solution to your “DMARC policy not enabled” warnings.
You don’t have to jump straight to reject mode, though. Smart implementation usually involves a gradual approach, starting with monitoring, moving to quarantine, and finally to reject—and that’s all while checking reports to guarantee your legitimate emails aren’t getting caught in the crossfire.
How to move from monitoring to enforcement
Upgrading from monitoring to enforcement doesn’t have to be a scary leap into the unknown. Here’s how to do it safely:
First, make sure you’ve spent at least 2-4 weeks in monitoring mode (p=none) and are actually receiving DMARC reports. These reports show you who’s legitimately sending email as your domain and who’s not.
Look for patterns in your reports. Identify all legitimate senders:
- Marketing platforms
- CRM systems
- Support tools
- Third parties authorized to send on your behalf.
Make sure they’re all properly authenticated with SPF and DKIM.
Instead of flipping the switch all at once, use the percentage tag (pct) to gradually increase enforcement. Your record might look like:
v=DMARC1; p=quarantine; pct=10; rua=mailto:reports@yourdomain.comThis tells receiving servers to quarantine only 10% of suspicious emails while letting the rest through. Once you build some confidence, increase that percentage until you reach 100%.
Once you’ve successfully tested quarantine mode, you can make the final move to reject. This is a process, not an overnight change, but the improved security is absolutely worth it.
Implementing your new DMARC policy
Now that you understand what DMARC policies do and how to safely transition, it’s time to update your DNS record. Don’t worry—creating a proper DMARC record isn’t rocket science, even though it can look a little funny at first glance.
A basic DMARC record with enforcement looks something like this:
v=DMARC1; p=reject; rua=mailto:dmarc-reports@yourdomain.com; pct=100Here’s what those elements actually mean:
- v=DMARC1: The version tag (always the same)
- p=reject: The policy tag set to full enforcement
- rua=mailto:reports@yourdomain.com: Where to send reports
- pct=100: Apply to 100% of messages
You might want to add a few more tags for better control:
- ruf=mailto:forensic@yourdomain.com: For detailed failure reports
- sp=reject: Sets policy for subdomains
- adkim=r: Relaxed DKIM alignment (the default)
- aspf=r: Relaxed SPF alignment (the default)
Now, your DMARC record lives in your DNS settings as a TXT record. The location is specific—it must be at:
_dmarc.yourdomain.comThe exact process for adding this record will depend on your DNS provider:
- With services like GoDaddy, Cloudflare, or Google Domains, look for DNS management options
- Navigate to the area where you can add TXT records
- Create a new TXT record with “_dmarc” as the host/name and your DMARC policy as the value
- Save your changes
DNS changes aren’t instant. They can take anywhere from minutes to 48 hours to propagate globally. Be patient.
Double-check your DMARC policy works
You’ve spent all this time getting your SPF, DKIM, and DMARC set up—now, it better work. Instead of just crossing your fingers and moving on with your day, check for these common mistakes:
- Double-check your email address for reports (typos mean you won’t get data)
- Don’t put quotation marks around your policy in the TXT record (your DNS provider adds these)
- Make sure you’re adding the record to the correct domain (easy to mix up when managing multiple domains)
- Verify the record after publication using a tool like Valimail’s Domain Checker
Check your
domain now
Enter your domain to see if it’s vulnerable to spoofing or if others are sending emails on your behalf. Instantly check your DMARC, SPF, and BIMI status with a detailed security report.
You’re not fully protected, learn more here.
Check your
domain now
Enter your domain to see if it’s vulnerable to spoofing or if others are sending emails on your behalf. Instantly check your DMARC, SPF, and BIMI status with a detailed security report.
You’re not fully protected, learn more here.
Check your
domain now
Enter your domain to see if it’s vulnerable to spoofing or if others are sending emails on your behalf. Instantly check your DMARC, SPF, and BIMI status with a detailed security report.
You’re not fully protected, learn more here.
Your Domain
Not protected AGAINST IMPERSONATION ATTACKS
DMARC NOT AT ENFORCEMENT
exampledomain1.com
Authentication Status for January 10, 2025
DMARC at Enforcement
SPF Record Configured
BIMI Ready
exampledomain1.com
Authentication Status for January 10, 2025
DMARC at Enforcement
SPF Record Configured
BIMI Ready
Time to lock down your domain
Congratulations! You’ve graduated from DMARC monitoring to full enforcement. Hopefully, those “DMARC policy not enabled” warnings are a thing of the past. And (more importantly) your domain is more protected against email spoofing and phishing attempts.
Still, email security isn’t a “set it and forget it” situation. To keep your domain secure:
- Review your DMARC reports regularly to spot new legitimate senders
- Update your SPF record whenever you add new email services
- Consider implementing BIMI (Brand Indicators for Message Identification) to display your logo in supporting email clients
- Stay on top of new email authentication standards as they emerge
We get it. You’ve got a lot on your plate. Managing all this manually can get overwhelming, especially if you’re handling multiple domains or working with several third-party senders. That’s where automation can make your life easier.
If you’re struggling with DMARC errors about your policy, we’re here to help. One of Valimail’s DMARC experts will jump on a 1:1 call with you to help troubleshoot. No commitments or sales pitches; just real DMARC help.