What is DKIM (DomainKeys Identified Mail)?
Learn how DKIM protects your domain from email spoofing
Learn how DomainKeys Identified Mail (DKIM) protects your brand, boosts deliverability, and works alongside DMARC to stop spoofing—plus how to test, check, and configure DKIM for your domain.

Table of Contents
When email was invented, there weren’t as many security concerns as today, and it was meant to be an open ecosystem. However, today, it’s all too easy for attackers to spoof your domain and impersonate your brand. That’s where DomainKeys Identified Mail (DKIM) comes in to help protect your domain.
DKIM is an email authentication protocol that uses cryptographic signatures to verify that a message hasn’t been tampered with in transit and truly authored by the domain it claims to represent. Unlike SPF (Sender Policy Framework), DKIM survives most forwarding scenarios, making it a more resilient and reliable signal for inbox providers.
While end users never see or interact with DKIM directly, it’s essential for your email administrators and security teams. When configured correctly, DKIM helps protect your domain, improve deliverability, and support DMARC (Domain-based Message Authentication, Reporting, and Conformance) enforcement without disrupting your users.
What is DKIM (DomainKeys Identified Mail)?
DKIM stands for DomainKeys Identified Mail. It’s an email authentication method that helps verify two critical things: that the message was authored by the domain it claims to be from and it wasn’t tampered in transit.
DKIM in cybersecurity does this using public-private key cryptography. When your mail server sends a message, it uses a private key to generate a digital signature and add it to a hidden message header. The recipient’s mail server retrieves the corresponding public key from your DNS records and checks the signature. If it matches, the message is authenticated.
A jargon-free explanation of DKIM: Think of DKIM like a wax seal on a letter. Your mail server “seals” each message with a private stamp. The receiving server compares it to a public version of the stamp stored in DNS. If the seal is intact and matches, the message is trusted.
A technical explanation of DKIM: A checksum is generated based on the body message content and email headers. This checksum is cryptographically “signed” using a private key known only to the sender, creating the DKIM signature. The signature is added to the message, along with a “selector” setting that points to a DKIM public key record in DNS, informing the recipient domain’s mail server which of a sending domain’s DKIM keys was used to sign the message.
On the receiving side, the mail server:
- Uses DNS to do a DKIM lookup for the public key at the location defined by the selector and domain in the DKIM header
- Validates the signature using that public key
- Confirms the message wasn’t altered and verifies which domain is responsible for the message
One domain can have multiple DKIM selectors, each tied to a different sender, making DKIM flexible and scalable for complex environments.
How does DKIM work?
At its core, DKIM proves that an email hasn’t been altered and that it was truly authorized by the domain it claims to be from. It does this by using public-key cryptography. Let’s break down how DKIM authentication works, step-by-step:
Here’s the step-by-step process for how DKIM works:
- Create a key pair.
The domain owner starts by generating a cryptographic key pair: one private key and one public key.
– The private key stays secure on the sending mail server.
– The public key gets published in DNS as a DKIM record, using a “selector” that points to a specific mail stream (like marketing@ or billing@).The public key is open to the world and publicly accessible, but only your private key can create signatures that will verify when checked against your public key.
- Generate the hash.
Each time an email user on that domain sends a message, the sender’s email platform generates a hash based on the content of the email headers and message body. That hash is then encrypted, using the domain’s Private key. This unique Encrypted Hash is encoded with Base 64 and is then attached to a hidden header in the email message.
- Recompute the hash.
The receiving email server attempts to regenerate the hash based on the same message content, email headers, and message body.
- Authenticate the message.
If the Hash value calculated by the receiving server matches the encrypted hash found in the email headers, the email passes DKIM authentication. This proves the message hasn’t been tampered with since it was initially signed. The recipient knows exactly which domain and selector it was signed by.
Why does DKIM matter?
DKIM is foundational in making email more trustworthy for senders, recipients, and inbox providers. While it works behind the scenes, its impact is significant. Here’s why it matters:
Verifies message identity
DKIM helps ensure that an email hasn’t been altered in transit. If anything in the message body or key headers changes slightly, the DKIM signature won’t match, and the message will fail authentication. This protects against tampering and makes it harder for bad actors to inject malicious content after sending a message.
Confirms domain-level responsibility
By signing a message with a private key tied to your domain, DKIM acts like a digital signature that says: “Yes, we sent this.” That gives mailbox providers a way to associate a message with your domain, even if the message was sent on your behalf by a third party, like a marketing platform or CRM.
Builds trust with inbox providers
Passing DKIM authentication is one of the many signals that mailbox providers (like Google, Microsoft, and Yahoo) use to decide whether to deliver, flag, or reject your messages. Inconsistent or failing DKIM can hurt your deliverability, while a strong, consistent setup improves your reputation over time.
Passes DMARC
DKIM is one of two authentication mechanisms (along with SPF) on which DMARC relies. To pass DMARC, your email must pass DKIM or SPF and align with (match) the “From” domain. If DKIM fails or isn’t aligned properly, your DMARC enforcement can break, leaving your domain open to spoofing and impersonation.
What is a DKIM selector?
A DKIM selector is a value used to identify something unique, such as a subdomain, a specific user, an office location, or an email cloud service. Selectors allow multiple public keys per domain, enabling you to have different DKIM signature configurations or implementations for these different platforms
A single domain could have many selectors, each one for a different sender. This allows for many different services to send on behalf of the domain without all needing to share the same private key.
For multiple platforms to share the same selector and private key, they would all need to have access to the same private key file, akin to multiple users sharing a username and password to an account login. This introduces a security risk and is strongly discouraged.
A DKIM selector is a string used to locate the public key for verifying the DKIM signature. It allows you to manage multiple keys for different services or departments.
DKIM selectors allow you to:
- Enable key rotation without service disruption
- Allow multiple services (e.g., Google, Microsoft 365, Mailchimp) to send on behalf of the same domain (without sharing the same private key)
- Enhance control and traceability
When setting up your DKIM selectors, follow these best practices:
- Use unique selectors for each service
- Document selectors and expiration policies
- Monitor DNS for incorrect or outdated selectors
What are DKIM records and headers?
According to a 2024 study of DKIM records, it was discovered that 96.6% of records were valid. Most DKIM implementations utilize the RSA digital signature algorithm, with only a few instances of sites utilizing the Ed25519 algorithm.
To successfully configure and validate DKIM, it’s helpful to understand what’s happening with the DKIM header added to your email messages and the DKIM DNS record published for your domain.
When you send a message with DKIM enabled, the mail server adds a special header that looks like this:
DKIM-Signature: v=1; a=rsa-sha256; d=example.com; s=selector1;
h=from:to:subject:date; bh=abc123…; b=xyz456…
Let’s break down the anatomy of a DKIM header:
|
Tag |
Meaning |
Explanation |
|---|---|---|
|
d= |
Signing Domain |
Indicates the domain that signed the email (e.g., example.com). It tells the receiver which domain is taking responsibility, such as Gmail or Hotmail. |
|
s= |
Selector |
Specifies the selector used to locate the DKIM public key in DNS (e.g., selector1._domainkey.example.com). |
|
h= |
Signed Headers |
Lists which headers are included in the signature (e.g., From, Subject, Date). Any changes to these will cause the DKIM check to fail. |
|
bh= |
Body Hash |
A hash of the message body before encryption, used to ensure the body content hasn’t been altered. |
|
b= |
DKIM Signature |
The actual encrypted signature, created using the sender’s private key, is used to verify the message’s integrity. |
Anatomy of a DKIM DNS Record
Every DKIM setup includes a TXT record published in your domain’s DNS. Here’s an example:
selector1._domainkey.example.com TXT
“v=DKIM1; k=rsa; p=MIGfMA0G…IDAQAB”
Each part of the record tells the receiving server what to expect:
|
Tag |
Meaning |
Explanation |
|---|---|---|
|
v=DKIM1 |
Version |
Specifies the DKIM version. This is always DKIM1. |
|
k=rsa |
Key type |
Indicates the type of cryptographic key used. RSA is the current standard. |
|
p= |
Public key |
Contains the actual public key used by receiving servers to verify the DKIM signature. |
If you want to check your DKIM record, you can find it in your DNS, under a name built from the selector and your domain. It’ll look something like this:
selector1._domainkey.yourdomain.com
If you can’t find your DKIM record, you’ll need to add one to your DNS. You will go to your DNS hosting provider and create a TXT record under the appropriate selector. This is an example of what to fill in:
- Host: selector1._domainkey
- Type: TXT
- Value: Your public DKIM key (starts with v=DKIM1; k=rsa; p=)
After all of that information is filled, save and propagate the record in your DNS. You can then test DKIM by sending a sample email to view the DKIM headers and check your DKIM record.
Want to ensure better protection for your email sending? Make DMARC enforcement a priority. We can help. Valimail will automate DMARC without any required DNS updates. We’ll keep your domain security safe and up-to-date. Schedule a demo to see how we can automate your email authentication and lock down your domain.
Common DKIM errors and troubleshooting solutions
DKIM key management is vital for providing proper security and protection. Email senders need to understand the significance of different DKIM key lengths (longer keys are more secure). However, managing the public DKIM keys can be difficult since they are hosted in DNS.
DKIM keys are long strings of random-looking data and can quickly get mistyped in the DNS. Even a simple copy/paste issue will cause legitimate email messages to fail DKIM. Many common errors can come with setting up your DKIM. Here are some common issues organizations face and how to fix them:
DKIM signature doesn’t match
One of the most frequent DKIM failures occurs when the receiving server recalculates the email’s hash and finds it doesn’t match the original DKIM signature. This typically means the message was modified in transit, often by a mail scanner, anti-virus gateway, or signature footer insertion (especially with SEGs).
To address this:
- Check whether the body or headers are being altered after signing.
- Consider using relaxed canonicalization (both for headers and body) instead of the stricter “simple/simple” setting. Relaxed settings allow for minor changes, like whitespace or line breaks, without breaking the signature.
- Check the affected message body for special, non-alphanumeric characters (Unicode, emoji, etc.), as some mail systems modify the encoding of certain “non-ASCII” characters in transit.
DKIM record not found
If a DKIM record can’t be located during the authentication check, the issue usually lies within the DNS. First, verify that the selector specified in the DKIM header matches a valid TXT record in DNS. Even a small typo can result in a failed DKIM lookup.
Other causes include:
- DNS propagation delays: After publishing a new record, it may take time for changes to fully propagate across global DNS resolvers.
- Incorrect or missing TXT record: Double-check the formatting of the DKIM record, and ensure it’s under the correct subdomain (e.g., selector1._domainkey.yourdomain.com).
DKIM failures with cloud providers
Cloud-based platforms like Microsoft 365, Google Workspace, and major ESPs often require special attention to DKIM configuration.
- Microsoft 365: DKIM is not enabled by default. Make sure it’s turned on in the Admin Center under the appropriate domain. Microsoft generates its own selectors (selector1 and selector2) and expects DNS records to be added accordingly.
- Google Workspace: You must verify domain ownership, generate DKIM keys in the Admin Console, and publish the corresponding public key in DNS.Note that you must enable Gmail for your domain, and then wait 24-72 hours, before Google will allow you to configure DKIM for that domain.
- Mailchimp, SendGrid, and other ESPs: These services typically provide preconfigured DKIM selectors and expect you to add them to DNS manually. Always confirm that the signing domain matches or aligns with the From domain to avoid DMARC failures.
Cloud providers often apply their own DKIM signature, for their own domain, by default, when you first gain access to and configure your environment within their platforms. You’ll often find DKIM signatures being added automatically to your email messages using their default domains (mcsv.net, sendgrid.net, onmicrosoft.com, gappssmtp.com) – you still need to proceed with the DKIM configuration settings as described above, so that you may sign messages as your domain, not just with the provider’s default domain.
One of the most frequent DKIM failures occurs when the receiving server recalculates the email’s hash and finds it doesn’t match the original DKIM signature. This typically means the message was modified in transit, often by a mail scanner, anti-virus gateway, or signature footer insertion (especially with SEGs).
To address this:
- Check whether the body or headers are being altered after signing.
- Consider using relaxed canonicalization (both for headers and body) instead of the stricter “simple/simple” setting. Relaxed settings allow for minor changes, like whitespace or line breaks, without breaking the signature.
- Check the affected message body for special, non-alphanumeric characters (Unicode, emoji, etc.), as some mail systems modify the encoding of certain “non-ASCII” characters in transit.
If a DKIM record can’t be located during the authentication check, the issue usually lies within the DNS. First, verify that the selector specified in the DKIM header matches a valid TXT record in DNS. Even a small typo can result in a failed DKIM lookup.
Other causes include:
- DNS propagation delays: After publishing a new record, it may take time for changes to fully propagate across global DNS resolvers.
- Incorrect or missing TXT record: Double-check the formatting of the DKIM record, and ensure it’s under the correct subdomain (e.g., selector1._domainkey.yourdomain.com).
Cloud-based platforms like Microsoft 365, Google Workspace, and major ESPs often require special attention to DKIM configuration.
- Microsoft 365: DKIM is not enabled by default. Make sure it’s turned on in the Admin Center under the appropriate domain. Microsoft generates its own selectors (selector1 and selector2) and expects DNS records to be added accordingly.
- Google Workspace: You must verify domain ownership, generate DKIM keys in the Admin Console, and publish the corresponding public key in DNS.Note that you must enable Gmail for your domain, and then wait 24-72 hours, before Google will allow you to configure DKIM for that domain.
- Mailchimp, SendGrid, and other ESPs: These services typically provide preconfigured DKIM selectors and expect you to add them to DNS manually. Always confirm that the signing domain matches or aligns with the From domain to avoid DMARC failures.
Cloud providers often apply their own DKIM signature, for their own domain, by default, when you first gain access to and configure your environment within their platforms. You’ll often find DKIM signatures being added automatically to your email messages using their default domains (mcsv.net, sendgrid.net, onmicrosoft.com, gappssmtp.com) – you still need to proceed with the DKIM configuration settings as described above, so that you may sign messages as your domain, not just with the provider’s default domain.
Pro Tip:
Valimail simplifies these DKIM challenges
By automating DKIM configuration, validating DNS records, and monitoring for failures across every sender in your ecosystem, DKIM management becomes much easier. You’re never left guessing why authentication broke.
Check out the Valimail DKIM Continuous Protection Report
https://youtu.be/GdCSMRPdXz0
DKIM management best practices
Domain owners need to track the age of specific DKIM keys to rotate them regularly. In many cases, this is not happening. While senders could manually create individual DKIM key records for each email service they use, they often don’t, meaning all services use the same key, making tracking impossible.
Domains using multiple cloud-sending services should use a separate set of DKIM keys. Otherwise, an error in importing keys into DNS can block all services using that key pair.

To ensure long-term DKIM security and performance, domain owners should follow a few key best practices:
- Use 2048-bit Keys: Older 1024-bit keys are now considered weak. Upgrading to 2048-bit encryption significantly improves your domain’s cryptographic protection.
Key length matters, as well. According to Ars Technica, as of 2024, a 512-bit RSA key can be cracked in just 24 hours for about $70. Instead, longer keys like 1024-bit or, ideally, 2048-bit are now the standard. Cracking a 2048-bit RSA key using today’s computing power would take an estimated 300 trillion years, a level of protection that major providers like Google explicitly recommend.
- Rotate keys on a regular basis: DKIM key rotation is the practice of retiring old cryptographic keys and replacing them with new ones to maintain email authentication security. This helps prevent misuse if a private key is ever exposed or becomes outdated.
|
Keys should be rotated at least every 6 to 12 months. Track the age of each key and maintain a renewal schedule to reduce the risk of compromise. Valimail’s DKIM report automatically lets you know when to rotate out your old DKIM keys or retire them because you’re not using them. |
- Assign unique selectors: Every email-sending service should use its own DKIM selector. This separation makes it easier to audit, troubleshoot, and retire old keys without disrupting unrelated senders.
- Monitor DKIM key expiration dates: Record when each key was issued and set reminders for expected renewal. Many organizations forget to rotate keys simply because they don’t track them.
- Audit DNS records: Remove stale or unused DKIM records from DNS, and validate syntax to ensure there are no formatting errors that could cause authentication failures.
Ultimately, managing DKIM at scale can become complex, especially when multiple departments or vendors are involved. That’s why automation is essential. Valimail handles DKIM configuration and key lifecycle management so you can stay secure without juggling DNS updates.
Start managing your DKIM with Valimail
The benefits of DKIM
When DKIM was created, it was intended to be an anti-spam tool, not an anti-fraud tool mechanism. The goal was to verify who actually sent a message, so, for instance, you could reliably trace a message back to SendGrid, no matter which client SendGrid was sending it on behalf of. In this goal, it succeeds.
Because the DNS system is globally distributed and robust, this gives DKIM signatures provable authority: Only the owner of a domain can sign messages for that domain. Also, DKIM signatures can survive forwarding: If the message’s contents are not altered, the DKIM signature will still work. (This is not true of SPF authentication.)
DKIM also guarantees that the contents of the message have not been altered, because the signature is based on the message body as well as key headers (such as From, To, and Subject). As a result, if you trust the entity that signed the message, you can trust the contents. An altered message’s DKIM signature will no longer authenticate properly.
https://www.youtube.com/watch?v=b8cPiqdgoPc
DKIM vs. SPF vs. DMARC: What’s the difference?
DKIM is one of three key standards enabling email authentication. Email authentication isn’t a one-size-fits-all solution, and DKIM isn’t working alone. To truly defend your domain against impersonation, phishing, and deliverability issues, you need a trio of protections: SPF, DKIM, and DMARC.
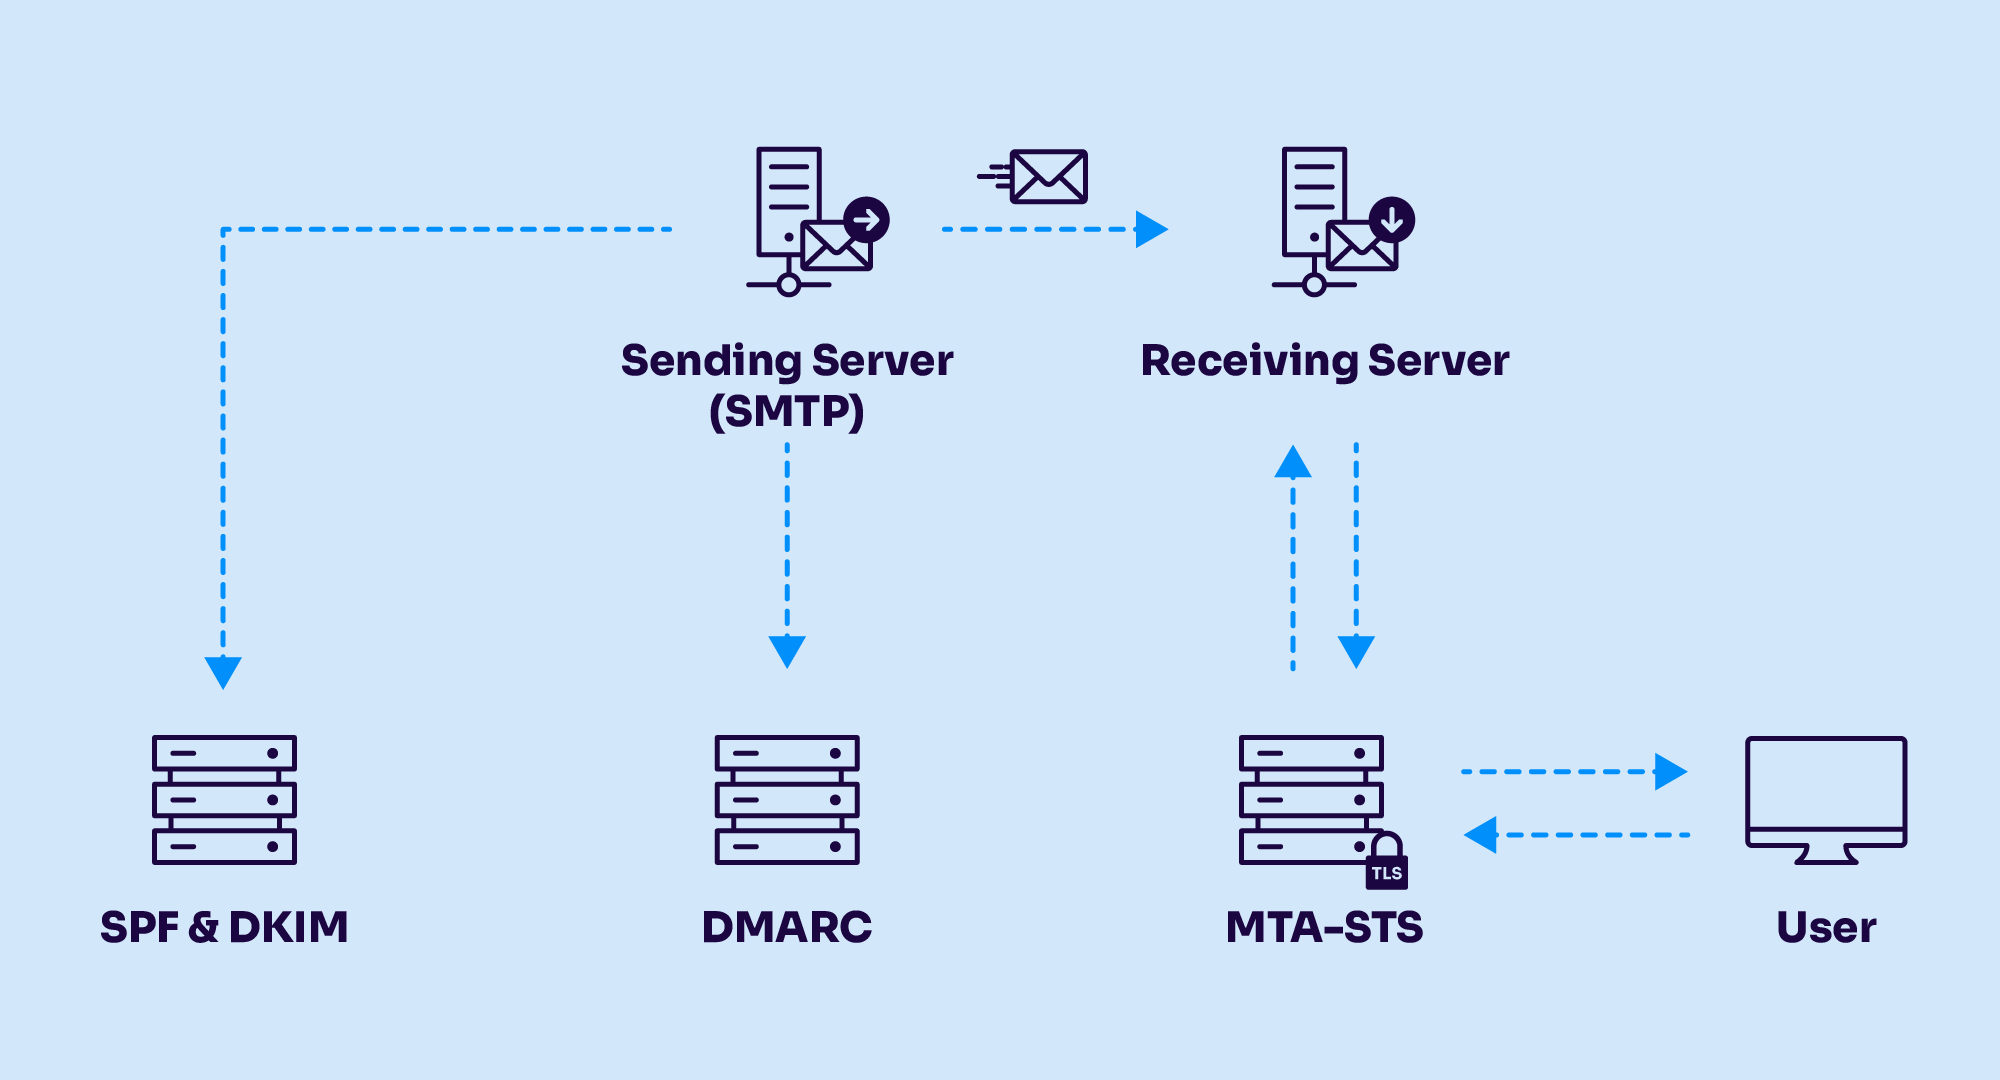
Each protocol plays a distinct role in verifying identity and message integrity.
|
Protocol |
What it validates |
How it works |
Key limitations |
|---|---|---|---|
|
SPF (Sender Policy Framework) |
Sender IP address |
Verifies if the IP sending email is authorized in DNS |
Breaks on forwarding; lacks message integrity |
|
DKIM (DomainKeys Identified Mail) |
Message content + signing domain |
Uses private/public key cryptography to sign email headers |
Doesn’t enforce policy on its own |
|
DMARC (Domain-based Message Authentication, Reporting, and Conformance) |
Domain alignment + authentication result |
Combines SPF + DKIM enables enforcement + visibility |
Requires correct configuration and alignment |
Together, these protocols form the backbone of modern email security. DKIM brings cryptographic proof of authorship; SPF verifies who can send on your behalf; and DMARC ties it all together with policy control and reporting.
Want to check your email authentication status? Use Valimail’s free domain checker:
Check your
domain now
Enter your domain to see if it’s vulnerable to spoofing or if others are sending emails on your behalf. Instantly check your DMARC, SPF, and BIMI status with a detailed security report.
You’re not fully protected, learn more here.
Check your
domain now
Enter your domain to see if it’s vulnerable to spoofing or if others are sending emails on your behalf. Instantly check your DMARC, SPF, and BIMI status with a detailed security report.
You’re not fully protected, learn more here.
Check your
domain now
Enter your domain to see if it’s vulnerable to spoofing or if others are sending emails on your behalf. Instantly check your DMARC, SPF, and BIMI status with a detailed security report.
You’re not fully protected, learn more here.
Your Domain
Not protected AGAINST IMPERSONATION ATTACKS
DMARC NOT AT ENFORCEMENT
exampledomain1.com
Authentication Status for January 10, 2025
DMARC at Enforcement
SPF Record Configured
BIMI Ready
exampledomain1.com
Authentication Status for January 10, 2025
DMARC at Enforcement
SPF Record Configured
BIMI Ready
The limitations of DKIM alone
While DKIM is a step in the right direction, it’s not effective alone against email fraud, phishing, and spoofing. Because of its limitations, attacks could be executed from anywhere in the world, and the domain owner would have no clue.
While DKIM confirms that a message hasn’t been altered and was signed by a domain using a private key, it doesn’t prove that the visible “From” address is legitimate. That’s a major problem, because for most people, the domain in the From field is the only thing they look at to decide if a message is trustworthy.
Attackers can exploit this by:
- Mismatched signature: A phishing message can contain a perfectly valid DKIM signature from a different domain shown in the From field. The most important address is the domain in the From field. Humans use this to determine who or what a message is coming from.
- DKIM key security: If an attacker acquires a domain’s private key, they could start signing messages “as” that domain, and they would pass DKIM validation perfectly.
- No connection: DKIM signatures do not require any kind of connection to the mail servers controlled by the domain owner.
This creates a dangerous illusion of trust—one that DKIM, by itself, can’t prevent. Valimail recommends only using DKIM in the context of DMARC. When combined with SPF and managed under DMARC enforcement, DKIM becomes a powerful tool to stop:
- Exact-domain impersonation
- Inbound and outbound phishing
- Untrusted or unauthorized third-party senders
Valimail Enforce ensures that all three protocols are deployed correctly, aligned consistently, and enforced confidently.
A DMARC record is inserted as a TXT record alongside your other DNS records, with a name beginning with “_dmarc” followed by the domain to which the policy applies. For example, the DMARC record for “example.com” would be published at “_dmarc.example.com”.
https://www.youtube.com/watch?v=mUZAcOqAVdI
Want to ensure better protection for your email sending? Make DMARC enforcement a priority. We can help. Valimail will automate DMARC without any required DNS updates. We’ll keep your domain security safe and up-to-date. Schedule a demo to see how we can automate your email authentication and lock down your domain.
Real-world DKIM use cases
Enterprise email authentication strategy
Enterprises often rely on various third-party platforms, such as marketing tools, billing systems, support ticketing services, CRMs, and more, to send email on their behalf. This creates a fragmented sending environment that, if unmanaged, can lead to domain spoofing and deliverability failures.
DKIM centralizes control by ensuring each outbound message is cryptographically signed with a trusted, verifiable domain key. It gives IT and security teams the visibility and control they need to authenticate authorized senders, detect anomalies, and improve inbox trust.
When layered with DMARC, DKIM becomes a cornerstone of a scalable enterprise email authentication strategy.
Preventing spearphishing and executive impersonation
Spearphishing attacks often impersonate company executives to target finance, HR, or IT employees. These messages typically appear to come from a CEO, CFO, or other high-profile individual, making them especially dangerous.
DKIM helps block these attacks by ensuring that only messages signed with your organization’s private key, tied to your verified domain, can be delivered as “you.” Forged messages fail authentication checks without a valid DKIM signature from your domain, especially when combined with DMARC enforcement. The layered protection stops impersonation attempts at the gateway and protects your people from social engineering attacks before they ever reach the inbox.
DKIM with marketing automation platforms
Platforms like HubSpot, Mailchimp, Marketo, and Salesforce Marketing Cloud are widely used to run outbound campaigns, but they often send mail on your domain’s behalf. If DKIM isn’t correctly configured for these services, messages can appear unauthenticated, fail DMARC checks, end up in spam folders, or be rejected by mailbox providers.
Each platform typically requires you to publish specific DKIM selectors in DNS. Problems arise when teams skip this step or reuse selectors across services, reducing traceability and increasing risk. Valimail simplifies this process by automating DKIM setup, ensuring proper selector management, and keeping each sender compliant with your authentication policies.
Managing DKIM at scale across global footprints
For organizations with a global footprint, DKIM management becomes exponentially more complex. Multiple business units may operate under different domains or subdomains and contract with various email service providers for regional campaigns, support, and internal communications. Coordinating DKIM keys and selectors across all these domains (while maintaining alignment with SPF and DMARC) can quickly become unmanageable without a centralized solution.
Valimail enables organizations to manage DKIM at scale, offering visibility into all active senders, automating key rotation, and streamlining enforcement across geographies. The result is simplified governance, better security posture, and confidence that no part of your domain is unprotected.
“DKIM is the first and most important thing you need to set up before beginning email sends from any email marketing automation platform. With DKIM properly configured, you put your authentic self forward: proving that only you can send emails using your domain.”
Al Iverson
Industry Research and Community Engagement Lead at Valimail
How to implement and set up DKIM
Setting up DKIM can feel technical, but is straightforward when broken into clear steps. Whether you’re configuring DKIM on Microsoft 365, Google Workspace, or through a third-party ESP, the basic process follows the same pattern: generate keys, publish a DNS record, and enable signing.
- Generate your DKIM key.
Start by generating a public-private key pair.
The private key stays securely on your email server or service provider and is used to sign all outgoing messages.
The public key is published in your DNS as a TXT record. This allows receiving servers to validate your signatures.
Most modern platforms recommend 2048-bit keys for security. - Choose a DKIM selector.
A selector is a simple string that helps identify which DKIM key a message was signed with (e.g., selector1).
Using different selectors for different services (marketing automation, CRM, internal mail) makes it easier to manage and rotate keys.Example selector record:
selector1._domainkey.yourdomain.com - Publish the DKIM record in DNS.
Log in to your DNS provider (GoDaddy, Cloudflare, Squarespace, etc.).
Create a new TXT record with the following fields:Host/Name: <selector>._domainkey (e.g., selector1._domainkey)
Type: TXT
Value: v=DKIM1; k=rsa; p=YourPublicKeyHereSave and allow time for DNS propagation (this may take minutes to hours, depending on your provider).
- Enable DKIM signing in your platform.
In your email platform’s admin console, enable DKIM signing with the private key.
For Microsoft 365: Turn on DKIM in the Admin Center and publish the two DNS selectors Microsoft provides (selector1 and selector2).For Google Workspace: Generate the DKIM key from the Admin Console, publish the DNS record, and then click Start authentication to begin signing.
For ESPs like Mailchimp, HubSpot, or Salesforce Marketing Cloud: They’ll provide a preconfigured selector and public key for you to add to DNS.
- Test and validate DKIM.
Send a test email to verify that a DKIM-Signature header is present.Use a DKIM checker to confirm your DKIM record is live and passing.
Look for alignment between the From domain and the d= (domain) tag in your DKIM header to ensure messages also pass DMARC.
- Maintain and rotate keys.
Rotate your DKIM keys every 6–12 months to reduce risk if a private key is ever exposed.Track selectors to avoid leaving old keys active in DNS.
Automate monitoring with tools like Valimail Enforce, which alerts you to outdated or failing DKIM configurations.
Pro Tip
Always publish your own DKIM record.
Many providers automatically apply a DKIM signature using their own domain (e.g., sendgrid.net, mcsv.net) if you don’t configure one. This won’t pass DMARC alignment. Always publish your own DKIM record so mail is signed as your domain, not your provider’s.
See how Valimail Enforce overcomes DKIM challenges
How can I check my DKIM record?
DKIM works behind the scenes, so you won’t see it unless you know where to look. The good news: checking your DKIM setup doesn’t have to be complicated.
The easiest way: use Valimail’s free DKIM checker.
The fastest way to verify DKIM is to use a dedicated tool.
With the Valimail DKIM Checker, you can quickly confirm:
-
Whether your DKIM record exists
-
If your public key is published correctly in DNS
-
Whether your configuration is valid
Just enter your domain and selector, and you’ll get an instant result.
Check DKIM in an email header
You can also verify DKIM by inspecting an email message sent from your domain.
Open the message and view the full headers (often called “Show original” or “View source”). Look for:
-
DKIM-Signature: — confirms the message was signed
-
dkim=pass — confirms the signature was validated
If you see dkim=fail, or no DKIM signature at all, your configuration may need attention.
Send a test email
Another quick way to validate DKIM is to send a test email to a Gmail account.
-
Open the message
-
Click “Show original”
-
Look for DKIM: PASS in the results
This confirms that receiving servers can verify your DKIM signature.
Why DKIM checks matter
If DKIM isn’t working correctly, inbox providers can’t confirm that your messages are legitimate. That can lead to delivery issues and increase the risk of domain impersonation.
DKIM is one part of a stronger authentication framework that includes SPF and DMARC. Together, they help ensure only authorized senders can use your domain.
Manage DKIM efficiently with Valimail
Managing DKIM doesn’t have to become your full-time job. Whether you’re managing one domain or multiple subdomains across a large enterprise, Valimail’s DKIM solutions and our DKIM Continuous Protection Report.
As the recognized leader in DMARC and email authentication on G2, Valimail helps thousands of organizations move beyond manual DNS updates and error-prone key management.
Trust the established leaders in DKIM and DMARC, according to G2:


“Valimail helped simplify our SPF and DKIM management by providing an automated solution that ensures our email authentication records are correctly configured, eliminating SPF flattening issues and ensuring seamless DKIM key rotation.”

Herbert Schley
Director of Information Security at Nomad Health
Create a free Valimail account and get immediate visibility into your domain’s DKIM status. It’s the first and most important step to protecting your brand, your customers, and your reputation.
Create your free Valimail account
Additional DKIM resources
Stay current with the latest insights on email authentication, phishing prevention, and DKIM best practices. These resources dive deeper into the technical, strategic, and industry-specific aspects of DKIM to help you strengthen your domain’s security posture and make informed decisions.
Frequently asked questions about DKIM
As the global leader in DMARC and email authentication standards like DKIM, Valimail has helped more than 80,000 organizations protect their domains and block impersonation threats. This section covers the most frequently asked questions about DKIM, so you can better secure your email infrastructure with confidence.
Can I have multiple DKIM records for my domain?
Yes, you can have multiple DKIM records, each tied to a unique selector. We recommend this for senders using multiple platforms or sending services, like Mailchimp, Salesforce, and internal servers. Each DKIM record is tied to a unique selector, which helps inbox providers look up the correct public key for a specific sending service.
There’s no RFC-enforced ceiling on DKIM TXT records; the practical limit is DNS performance. Each additional selector creates another TXT DKIM lookup. Most mailbox providers cap total DNS look-ups per message at 10 for all authentication checks combined (SPF, DKIM, DMARC, BIMI, etc.). Exceed that and you’ll hit “permerror.”
How long should authenticating email with DKIM take?
DKIM authentication happens in real time as soon as you send or receive the email. If your DNS records are properly configured and your sending service signs emails, messages will be authenticated immediately. However, propagating your DNS with DKIM can take several hours depending on the registrar, so if you’re adding or changing your DKIM records, wait some time for the changes to go live.
Should I use DKIM without DMARC?
The short answer is no; you should always use DKIM with DMARC. Using DKIM on its own doesn’t enforce a policy and doesn’t have domain alignment, but DMARC does.
DKIM proves that the message wasn’t altered in transit and that it started on a server that is allowed to use your domain. But it doesn’t say what you should do if that check fails. Without DMARC added in, bad actors can spoof look-alike domains that pass DKIM and still trick end users because the domain in the From: header doesn’t align with the domain in the DKIM signature. Think of DKIM as the lock, and DMARC as the alarm system that calls security when someone jiggles the handle.
How do I add a DKIM record in GoDaddy?
- Sign in to GoDaddy → My Products → DNS → Manage DNS.
- Click Add Record and choose TXT.
- In Name, enter your selector plus ._domainkey (e.g., mail1._domainkey).
- Paste the long public key string into Value.
- Set TTL to 1 hour (or leave the default) and save.
That’s it. Give DNS a few minutes to propagate, then run a DKIM check to confirm the record is live. GoDaddy says most TXT record changes propagate within an hour, but global caches can take up to 24 hours.
If your check still fails after that window, clear local DNS caches and verify that the record value exactly matches the key provided by your email platform.
Is Squarespace better than GoDaddy for DKIM setup?
Both can be good options for setting up your DKIM, but the real differentiator is the control over the DNS.
|
Feature |
Squarespace |
GoDaddy |
|
DNS UI depth |
Minimalist—great for simplicity, but fewer advanced controls |
Full-featured—bulk editing, record templates |
|
TXT record limits |
Supports multiple TXT/DKIM entries, but UI scrolls can be clunky for large volumes |
Handles dozens of TXT records gracefully; bulk export/import saves time |
|
Propagate speed |
Typically < 15 min |
Typically 30 – 60 min (varies by TLD) |
|
API/Automation |
Limited (requires third-party integrations) |
Full REST API plus Terraform provider |
Squarespace can work if you only need a handful of TXT records and appreciate an easy user experience. But if you’re growing your stack and want to scale, GoDaddy has an advanced DNS and API automation that will help you save time with your DKIM management.
If I switch ESPs, do I need new DKIM keys?
You need new DKIM keys when you switch to a new ESP. Each ESP has its private signing keys, and when you migrate, you have to generate new keys. Then, you’ll have to publish a new public key under a fresh selector.
Next, update your DMARC alignment settings to accept the new domain/selector combo. Once you’ve fully migrated everything over, retire the old selectors. Wait at least 72 hours to ensure everything is updated and migrated properly to avoid affecting your email sending programs.
It is important to retire the old keys to close a common loophole where former vendors could still sign your email after you’ve left.
Where can I see the DKIM record in M365?
To see your DKIM record in M365, you can open your Microsoft Defender portal and follow this path:
- Email & collaboration
- Policies & rules
- Threat policies
- Email authentication settings
- DKIM tab
All of your domains, including custom and *.onmicrosoft.com will appear here.
How can I check my DKIM record?
The easiest way is to use a DKIM lookup tool.
With the Valimail DKIM Checker, you can quickly verify whether your DKIM record exists and is set up correctly. Just enter your domain and selector to get instant results.
You can also check manually by querying your DNS or reviewing email headers, but those methods require more time and technical effort.
Yes, you can have multiple DKIM records, each tied to a unique selector. We recommend this for senders using multiple platforms or sending services, like Mailchimp, Salesforce, and internal servers. Each DKIM record is tied to a unique selector, which helps inbox providers look up the correct public key for a specific sending service.
There’s no RFC-enforced ceiling on DKIM TXT records; the practical limit is DNS performance. Each additional selector creates another TXT DKIM lookup. Most mailbox providers cap total DNS look-ups per message at 10 for all authentication checks combined (SPF, DKIM, DMARC, BIMI, etc.). Exceed that and you’ll hit “permerror.”
DKIM authentication happens in real time as soon as you send or receive the email. If your DNS records are properly configured and your sending service signs emails, messages will be authenticated immediately. However, propagating your DNS with DKIM can take several hours depending on the registrar, so if you’re adding or changing your DKIM records, wait some time for the changes to go live.
The short answer is no; you should always use DKIM with DMARC. Using DKIM on its own doesn’t enforce a policy and doesn’t have domain alignment, but DMARC does.
DKIM proves that the message wasn’t altered in transit and that it started on a server that is allowed to use your domain. But it doesn’t say what you should do if that check fails. Without DMARC added in, bad actors can spoof look-alike domains that pass DKIM and still trick end users because the domain in the From: header doesn’t align with the domain in the DKIM signature. Think of DKIM as the lock, and DMARC as the alarm system that calls security when someone jiggles the handle.
- Sign in to GoDaddy → My Products → DNS → Manage DNS.
- Click Add Record and choose TXT.
- In Name, enter your selector plus ._domainkey (e.g., mail1._domainkey).
- Paste the long public key string into Value.
- Set TTL to 1 hour (or leave the default) and save.
That’s it. Give DNS a few minutes to propagate, then run a DKIM check to confirm the record is live. GoDaddy says most TXT record changes propagate within an hour, but global caches can take up to 24 hours.
If your check still fails after that window, clear local DNS caches and verify that the record value exactly matches the key provided by your email platform.
Both can be good options for setting up your DKIM, but the real differentiator is the control over the DNS.
|
Feature |
Squarespace |
GoDaddy |
|
DNS UI depth |
Minimalist—great for simplicity, but fewer advanced controls |
Full-featured—bulk editing, record templates |
|
TXT record limits |
Supports multiple TXT/DKIM entries, but UI scrolls can be clunky for large volumes |
Handles dozens of TXT records gracefully; bulk export/import saves time |
|
Propagate speed |
Typically < 15 min |
Typically 30 – 60 min (varies by TLD) |
|
API/Automation |
Limited (requires third-party integrations) |
Full REST API plus Terraform provider |
Squarespace can work if you only need a handful of TXT records and appreciate an easy user experience. But if you’re growing your stack and want to scale, GoDaddy has an advanced DNS and API automation that will help you save time with your DKIM management.
You need new DKIM keys when you switch to a new ESP. Each ESP has its private signing keys, and when you migrate, you have to generate new keys. Then, you’ll have to publish a new public key under a fresh selector.
Next, update your DMARC alignment settings to accept the new domain/selector combo. Once you’ve fully migrated everything over, retire the old selectors. Wait at least 72 hours to ensure everything is updated and migrated properly to avoid affecting your email sending programs.
It is important to retire the old keys to close a common loophole where former vendors could still sign your email after you’ve left.
To see your DKIM record in M365, you can open your Microsoft Defender portal and follow this path:
- Email & collaboration
- Policies & rules
- Threat policies
- Email authentication settings
- DKIM tab
All of your domains, including custom and *.onmicrosoft.com will appear here.
The easiest way is to use a DKIM lookup tool.
With the Valimail DKIM Checker, you can quickly verify whether your DKIM record exists and is set up correctly. Just enter your domain and selector to get instant results.
You can also check manually by querying your DNS or reviewing email headers, but those methods require more time and technical effort.
Get started for free
with Monitor
Start your path to DMARC enforcement with a panoramic view of the traffic being sent on your behalf.
No trial offers, credit cards, or obligations.
Explore all Valimail
has to offer
Go one step further than visibility…Take action! Reach DMARC enforcement faster. Stay compliant with evolving sender requirements. All while protecting your brand.